Sonic (my home ISP) offers an IPv6 tunnel for their customers who have a service plan that does not offer native IPv6 yet. Sonic’s IPv6 tunnel operates much the same way Hurricane Electric’s Tunnel Broker does, however since the endpoint is located inside the ISP you should get better performance. Sonic even offers example configurations for configuring the IPv6 tunnel endpoint on various operating systems, but none for DD-WRT, a common aftermarket router firmware. Another Sonic user did document how to configure Sonic’s IPv6 tunnel with older versions of DD-WRT on the Sonic forums at dev-random.me, however the link appears to be dead. Additionally newer versions of DD-WRT have a new IPv6 tab which should allow for a painless configuration using nothing more than the web interface.
Configuring the Modem
The first step is to put your modem into bridged mode. My modem was a Pace 5268AC. Bridged mode can be enabled by opening the modem’s configuration page at http://192.168.42.1/ and then going to Settings -> Broadband -> “Link Configuration” and at the bottom of the page deselect the check-box next to Routing and click save. You may need to reboot your router or have it renew its IP address from Sonic at this time. I initially attempted to configure an IPv6 tunnel using DMZplus, however, in this mode the modem does not forward IP protocol 41 which is needed by the IPv6 tunnel to the DMZ host. Additionally I found that when pinging your WAN IP over the Internet the modem would respond to the ping, as well as forward the ping request to the DMZ host as well, resulting in duplicate ping responses.
Configuring Sonic
The next step is to request a static IP address from Sonic if you have not done so already. This can be done from the members portal at “Internet Connections” -> “Fusion IP Configuration”. After this step you will likely need to enter the new static IP setting in your router to regain connectivity. Once that is done you are ready to request an IPv6 tunnel from Labs -> “IPv6 Tunnels”. Then select “View/Request Tunnel” to refresh the page with your tunnel information. Remember to enter your external static IP you were assigned from the previous page. This should show you your IPv6 Transport and Network addresses and subnets. Take note of these.
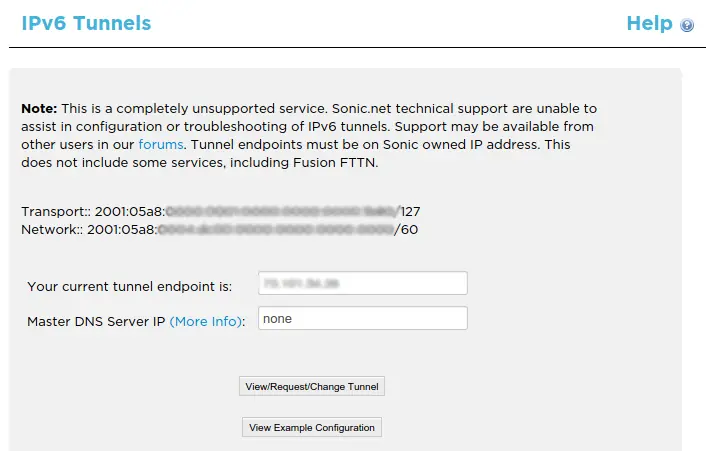
Now select “View Example Configuration”. You should now see the following 4 IP address: sonic-side v4 address, customer-side v4 address, Sonic-side transport IP, and customer-side transport IP.

Take note of all 4 of these IPs, as well as the Transport and Network from the previous page.
Configuring your DD-WRT router
Open your DD-WRT router’s configuration page (usually http://192.168.1.1) and go to Setup -> IPv6. If you do not have a IPv6 tab then you are likely running an older build of DD-WRT before the web interface got IPv6 support. I’m running r27506 but other builds should work just as well. From this page, first enable IPv6 and click save, this should make the page reload with all of the options. You want to use a “6in4 Static Tunnel”, with a prefix length of 60.
Static DNS 1 & 2 Sonic’s DNS servers do not have an IPv6 address (that I know of) so I used Google’s public DNS servers 2001:4860:4860::8888 and 2001:4860:4860::8844 for Static DNS 1 & 2.
Assigned / Routed Prefix should be the Network subnet from the previous page without the /60 at the end. So if your network is 2001:05a8:aaaa:bbbb:0000:0000:0000:0000/60 enter 2001:05a8:aaaa:bbbb::. :: is not a typo, it is an abbreviation used in IPv6 address notation for 0 bits.
Router IPv6 Address should be left blank, DD-WRT should automatically use the correct value.
Tunnel Endpoint IPv4 Address should be the “sonic-side v4 address” you took note of before. For me it was 208.201.234.221, but you may have a different value.
Tunnel Client IPv6 Address should be the “customer-side transport IP” from the Sonic example configuration page. The bitmask should be /127, however my build of DD-WRT has maxlength=2 set on form field. Editing the DOM directly and removing this limitation allows you to successfully enter 127.
MTU should be set to 0 to allow DD-WRT to automatically determine the correct value.
Radvd should be enabled.
When you are done your IPv6 configuration page should look like this:
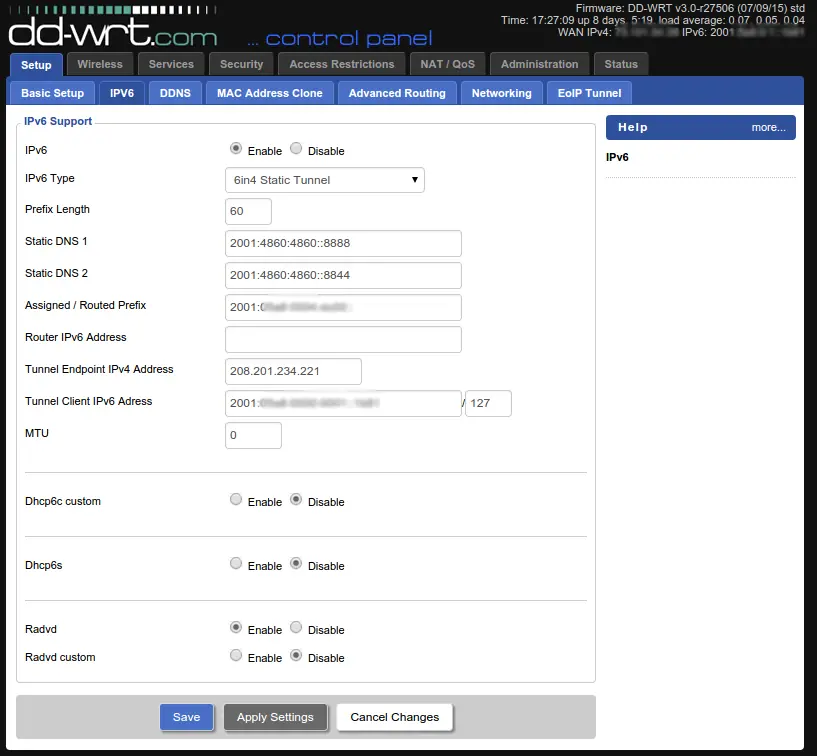
Click Save, then Apply, and then reboot the router. If everything is correct DD-WRT should show an IPv6 addresses in the upper right corner and should offer global IPv6 addresses to computers on the network.
Fixing ICMPv6 (PING)
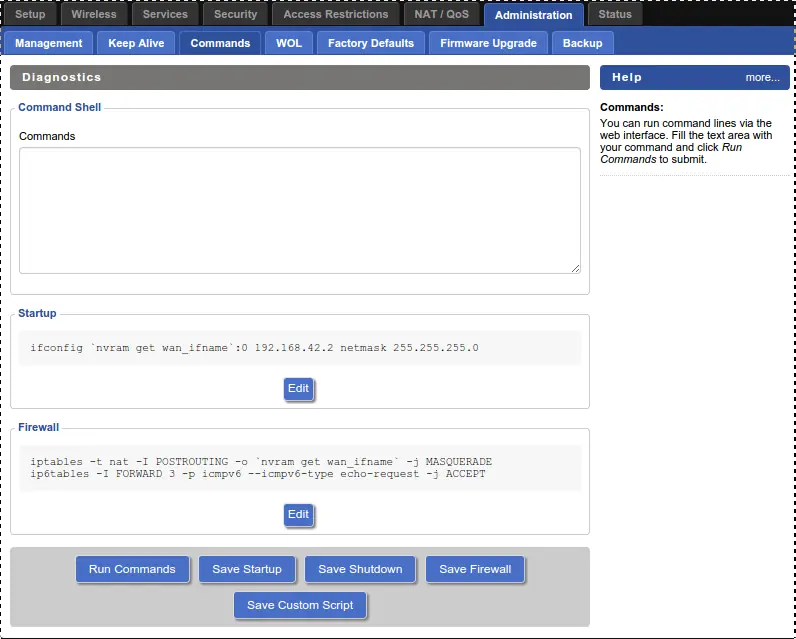
By default DD-WRT blocks incoming IPv6 pings to your computers on your network. If you want to be able to ping individual computers on your network over the Internet, add the following firewall rule to DD-WRT under Administration -> Commands.
ip6tables -I FORWARD 3 -p icmpv6 --icmpv6-type echo-request -j ACCEPT
After saving and applying you should be able to ping your computer’s global IPv6 address from any other IPv6 host on the Internet.
Enabling Modem Access
The big downside of putting your modem into bridged mode is that you can no longer access its configuration page. Some people don’t care about this, but I like it as it allows me to see my current connection rate and transmission errors. Bridge mode does not mean you need to loose modem access. With another firewall rule you can regain access to the modem’s configuration page. In DD-WRT under Administration -> Commands save the following line as the startup script:
ifconfig `nvram get wan_ifname`:0 192.168.42.2 netmask 255.255.255.0
And add the following line to the router’s firewall script:
iptables -t nat -I POSTROUTING -o `nvram get wan_ifname` -j MASQUERADE
These rules give DD-WRT a second IP of 192.168.42.2 which allows routing to the same subnet the modem is on. After saving, applying and rebooting visiting http://192.168.42.1 should bring the modem’s configuration page back up. It should look something like this:
Success
If everything went well you should have a fully functional IPv6 tunnel to your home network. You can verify this by using test-ipv6.com or ipv6-test.com.