Part 1 - Screen
Screen is a program that can create virtual terminals inside your current session. If you are familiar with tabbed web browsers, think of screen as adding tabs to your terminal. And if your server allows it can allow you to disconnect sessions and keep them running in the background, even if you log out.
You can install screen on Debian with apt-get by running sudo apt-get install screen and yum install screen for rpm based systems.
Start screen by running:
screen
The first time you run screen it will create a new window. This window is just like the session you left behind to enter screen. You can run any program you usually would have, and exit or close the window by typing exit and pressing enter.
Now for the fun part! Enter a new screen session by running screen. You can now run any program you like and leave it running, start your cli mail client or wget a large file. Now press Ctrl-a and then c. This will create a new windows (or tab if you will) in your current screen session. Ctrl-a is the screen hot-key to allow the user to enter a command to screen and not the currently running program or the current shell. In the previous example (Ctrl-a c), we told screen we were going to give it a command, then gave it the ‘c’ command, which stands for Create. As you can guess, this created a new screen window.
Some of the important screen commands are Ctrl-a k: kills the current window, same as typing exit. Ctrl-a w: lists all open windows, Ctrl-a n: go to the next window or cycles through the available windows. Ctrl-a d: this will detach the current sessions, this allows the sessions to run in the background while you are dropped back into your shell. You can resume the session anytime later (even after logging out) by running:
screen -r [SESSION_NAME]
You can view a list of the available screen sessions by running:
screen -ls
However there is a wild-card resume that will resume the last open session or create one if there are none, to resume any open session run:
screen -R
Screen can also do much more, If you want to learn more take a look at the screen manual.
Part 2 - SSH as a proxy
Openssh server has the ability to be used as a SOCKS proxy. Using it as a socks proxy will allow you to run your proxied applications network traffic through the ssh server.
Windows with putty
You can use putty to allow a windows client to connect to the ssh/socks proxy. On the putty client go to the Tunnels page and enter any source port you want, this will be the port that you will tell your local application to use at the proxy server port. Leave the destination field blank and select the dynamic check-box. Select Add to add the port. It should look like this:
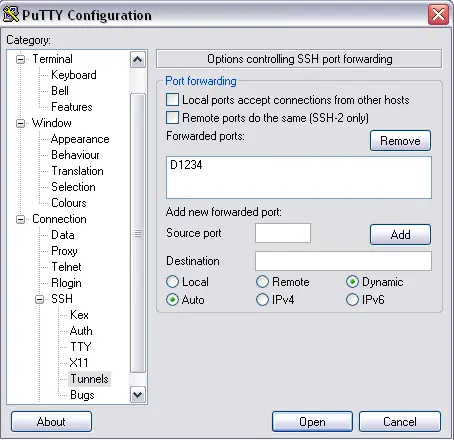
From here once you connect to the ssh server the port you specified on 127.0.0.1 or localhost will open as a socks proxy.
Linux
To connect to an ssh server and use it as a SOCKS proxy using Linux connect to the ssh server the way you normally would but add -D [PORT] as a parameter. -D tells the destination port to be dynamic and [PORT] is the port that will listen for the proxy server on the local computer, just remember if you are not root locally your port needs to be over 1024. Here is an example:
ssh -D 1234 mrlanrat@sshserver.com
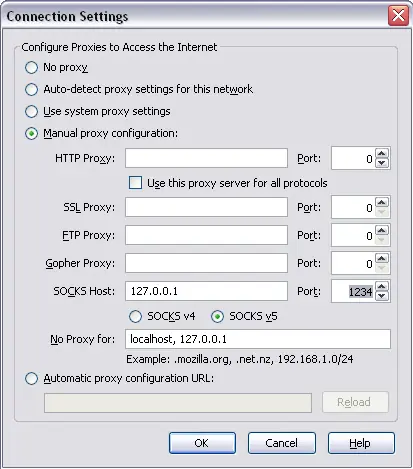
Using the Proxy
Here is an example setting up the proxy with Firefox, it should be a similar configuration for other programs.
Part 3 - X11 Forwarding
X11 forwarding allows you to run X or graphical applications on the server over ssh. To forward X programs over ssh on Linux apply the -X parameter, below is an example.
ssh -X user@host
If you want to compress the X information while it is being transferred apply the -c argument.
ssh -c -X user@host
And you can start X11 applications and allow the shell to still remain active by applying a & to the end of the application. example:
firefox &
If you want to start the complete X desktop over ssh and not just a single application you can run:
startx
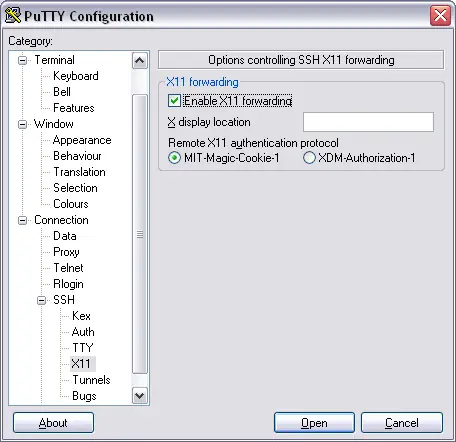
On windows you can enable ssh in putty by clicking the enable X11 forwarding checkbox in the X11 tab. screenshot below:
Part 4 - Reverse SSH
You can ssh into a server that is behind a NAT through a reverse ssh server. Put simply the server would need to ssh into either the client machine or a machine that the client has access to, like a middleman. When the server sshs into the other computer you will need to have it tunnel its port 22 (or the port that ssh is running on) to any port on the computer client or middleman that the server is sshing to. Below is an example of this:
ssh -R 2222:localhost:22 user@client
This assumes that port 2222 is the port the client or middleman will have open that will allow the client to ssh into the server. user@client is the user and host of the client or middleman server. From there have the client either ssh into itself or the middleman server and it will be tunneled into the server.